QRES Resilience Mapper Plugin for QGIS
1. Introduction
QRES/Resilience Mapper is a QGIS plugin developed to help users assess the spatial resilience of urban areas through proximity-based analysis. The plugin calculates resilience values for a selected, user-defined grid of points, measuring how well different parts of a city are served by key urban resources such as schools, healthcare facilities, shops, transport, parks and other amenities. The analysis draws urban feature data from OpenStreetMap (OSM) and uses MapBox isochrones to calculate travel-time accessibility. By using travel-time accessibility rather than simple radial or straight-line distances, and by combining QGIS spatial workflows, open geographic data and isochrone-based computation, QRES generates resilience scores that can be visualised, compared and exported for further analysis.
The plugin represents the culminating output of several years of collaborative (still ongoing) research between the University of Hertfordshire, Dr Luigi Pintacuda; the University of Greenwich, Professor Silvio Carta; the University of Pisa, Dr Tommaso Turchi; and MKS D-Tech Ltd, Mauro Sabiu. This research has been developed through a series of publications exploring resilient communities, computational urban analysis, GIS-based methods and proximity-driven resilience modelling. QRES translates this research into an operational tool for urban design, planning, research and education, supporting users in understanding the relationship between urban morphology, accessibility, resource distribution and community resilience. The original research underpinning the plugin presented QRES as a QGIS-based workflow for calculating resilience through urban resource proximity and isochrone-based accessibility.
The first public release of QRES is Version 2, developed in 2026. This version builds on the original V1 prototype, which involved the full research group and was distributed for testing and methodological validation. QRES V2 was developed by Dr Luigi Pintacuda, University of Hertfordshire, and Mauro Sabiu, MKS D-Tech Ltd, with the specific aim of improving the plugin’s speed, reliability and overall stability. V2 also introduces the option to select specific feature groups when launching the analysis. This allows users to focus on particular categories of urban resources and can reduce processing time when assessing very large datasets, especially where a higher number or finer resolution of analysis points is required. In our testing, large metropolitan areas performed well; however, reducing the number of selected feature groups may facilitate more efficient processing where users need to increase the density of the point grid. While users can choose which feature groups to include in each analysis, these categories are not arbitrary: they are based on the urban features identified and tested through the previous research studies underpinning the plugin.
The development of QRES is dedicated to the memory of the late Professor Silvio Carta, a friend, mentor and exceptional researcher. Silvio was an active and generous contributor to the intellectual foundations of this work and played an important role in the development of the original V1 prototype. His research, insight and commitment were central to the evolution of the project. Although he left us too early, his legacy remains embedded in this work and in the wider research trajectory that made QRES possible.
2. What QRES does
QRES calculates spatial resilience values for a user-defined grid of points within a selected urban area. Each point is treated as an analysis location from which the plugin assesses the accessibility of predefined groups of urban resources. These resources are extracted from OpenStreetMap and include facilities and amenities that have been identified through the previous research underpinning the plugin.
For each analysis point, QRES uses MapBox isochrones to estimate travel-time accessibility to selected feature groups. This allows the plugin to evaluate proximity through realistic movement time rather than through simple radial distance. The resulting values indicate how strongly each point is served by the selected urban resources, producing both an overall resilience value and feature-specific values.
The output can be used to compare different parts of a neighbourhood, district or city; identify areas that are well served or under-served by specific resources; and support evidence-based urban analysis, planning and design decisions. Results are written back into QGIS as spatial data and attribute values, allowing users to map, visualise and export the analysis for further interpretation.
3. Requirements before installation
Before installing and using QRES, users should ensure that the following requirements are in place.
3.1 QGIS
QRES is developed for use within QGIS. Users should install a recent stable version of QGIS before installing the plugin. The current public release has been developed and tested for the QGIS 3.x environment. An adaptation for QGIS 4.x is currently in development.
3.2 Installing QRES
QRES can be installed directly from the QGIS Plugin Repository.
To install the plugin:
- Open QGIS.
- Go to Plugins in the top menu.
- Select Manage and Install Plugins.
- In the search bar, type QRES.
- Select the QRES plugin from the results.
- Click Install Plugin.
Once installed, QRES will be available from the QGIS plugin interface and can be launched from the relevant plugin menu or toolbar icon.
3.3 Internet connection
An active internet connection is required when running the analysis. QRES retrieves urban feature data from OpenStreetMap and uses MapBox to generate isochrones. Without an internet connection, the plugin will not be able to access the data and services required to complete the analysis.
3.4 MapBox account and access token
QRES requires a MapBox account and access token to generate the isochrones used for travel-time accessibility calculations.
The token is requested the first time QRES is run. It can be updated later by opening the plugin and clicking Configure MapBox Token.
At the time of writing, the MapBox free tier allows up to 100,000 isochrone requests, which in our testing was sufficient for multiple analyses with large point datasets. Users should still check the current MapBox terms, pricing and request limits before running large or repeated analyses.
3.5 OpenStreetMap data availability
QRES uses OpenStreetMap data to identify and locate urban resources. Results therefore depend on the availability, accuracy and consistency of OSM data in the selected study area.
In our testing across 16 large metropolitan areas, OSM coverage proved effective for this type of analysis. However, where OSM data is incomplete, outdated or inconsistently mapped, QRES results should be interpreted with appropriate care.
3.6 System performance
QRES can be used to analyse large urban areas, including metropolitan-scale datasets. With QRES V2, processing times have been significantly improved, and in our testing the plugin performed efficiently even with large datasets. While the analysis is running, users can normally continue using their computer for other tasks.
4. Preparing the project
Before running QRES, users need to prepare a QGIS project with a suitable study area and a regular point grid. The quality of the input preparation directly affects the reliability, readability and usefulness of the final results.
4.4 Define the study area
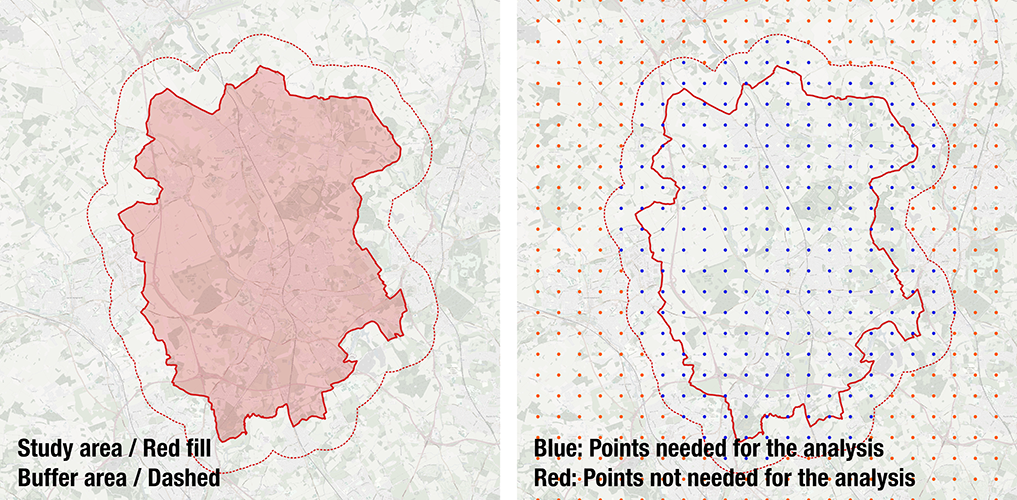
Define the urban area to be analysed and consider adding a buffer zone around it.
QRES analyses a regular point grid, where each point becomes an analysis location from which the plugin calculates accessibility to selected urban resources. Extending the analysis area slightly beyond the main study boundary allows points near the edge to account for resources located just outside the boundary. This produces a more reliable assessment at the margins. The final interpretation can still focus on the original study area, while the calculation benefits from a wider spatial context.
4.5 Coordinate reference system (CRS)
Use an appropriate coordinate reference system for the selected study area. The CRS should be suitable for the local context and set in metres, not degrees.
This is important when creating the point grid, measuring distances and producing visualisations. For example, a grid spacing of 1,000 represents 1,000 metres only if the project uses a projected CRS in metres. Before running QRES, check that the CRS is correct, that the point grid aligns with the map, and that the study area is correctly located.
4.6 Create the regular point grid
QRES requires a regular point grid as the input layer. Each point acts as an analysis location from which the plugin calculates accessibility to selected urban resources.
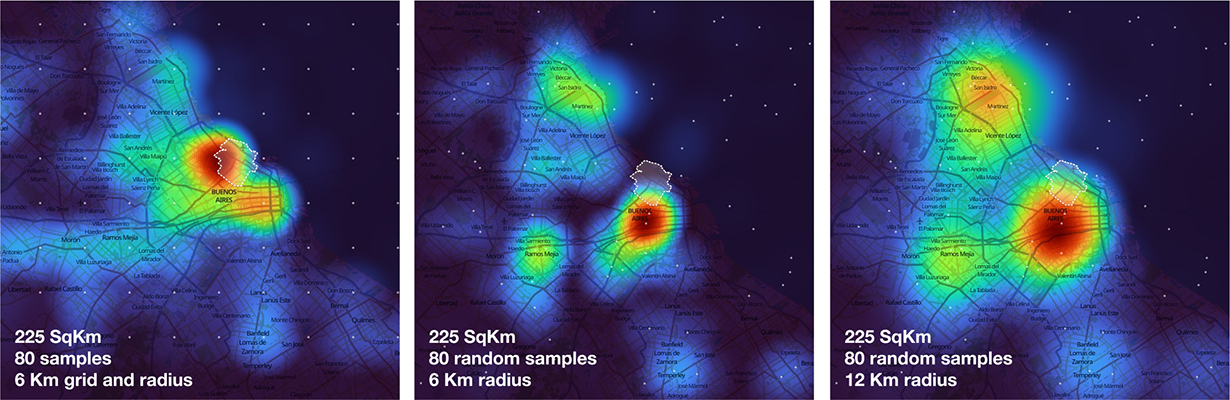
The grid should be regular rather than random or irregular. The research underpinning QRES shows that Kernel Density Estimation (KDE) heatmap visualisation is strongly affected by the density and distribution of points. In the original testing, a regular grid produced more reliable spatial outputs, while a random distribution of the same number of points generated less accurate results because of uneven point distribution.
A regular grid can be created directly in QGIS:
- Go to Processing Toolbox.
- Search for Create grid.
- Select Point as the grid type.
- Set the grid extent to the buffered analysis area, either by selecting a buffered boundary layer or by using the current map canvas extent.
- Set the horizontal and vertical spacing in metres.
- Run the tool and save the resulting point grid.
When setting the grid extent, remember to include the buffer zone where appropriate. This helps improve the reliability of results near the edge of the study area.
4.7 Choose an appropriate grid spacing
Select the grid spacing according to the scale and purpose of the analysis.
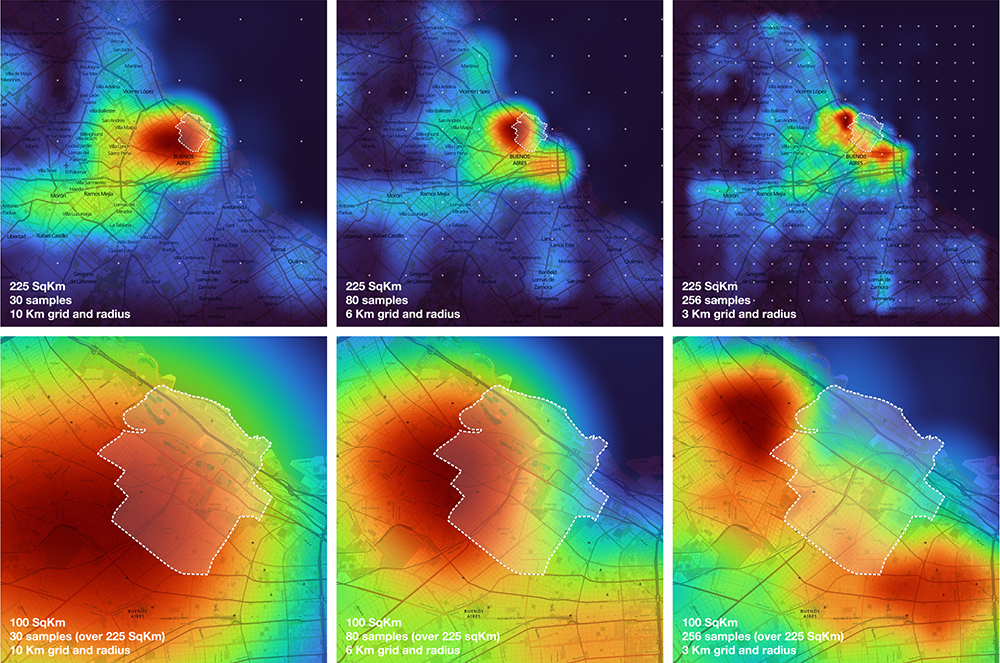
A smaller spacing creates a denser grid and a more detailed output, but also increases the number of points, calculations and MapBox isochrone requests. A larger spacing is faster to process, but produces a more generalised result.
As a practical guide:
- use a wider grid for initial testing or metropolitan-scale analysis;
- use a finer grid for neighbourhood, district or detailed urban analysis;
- increase the resolution only after confirming that the workflow runs correctly;
- consider reducing the number of selected feature groups when using a very dense grid.
The grid should be detailed enough to capture meaningful spatial differences, but not so dense that it creates unnecessary processing time or excessive API requests.
4.8 Clip or clean the point grid
After creating the grid, users may need to remove points that are not relevant to the analysis. This is useful when a regular point grid has been generated over a rectangular extent but the buffer zone (and the study area) has an irregular shape. In this case, points may fall outside the intended analysis area, particularly in the unused corners of the grid. Users may also wish to remove points that fall over large bodies of water or non-urban zones where the analysis would not be meaningful.
Cleaning the grid helps avoid misleading low values where urban resources are not expected. However, users should avoid removing useful buffer points too aggressively, as these can improve the reliability of results near the boundary of the main study area.
4.9 Check the input layer before running QRES
Before launching QRES, check that:
- the CRS is projected and set in metres
- the points cover the intended study area and buffer zone
- the grid is regular and evenly distributed
- unnecessary points outside the analysis area have been removed
- the layer has been saved properly
- the internet connection is active
- the MapBox access token is available or already configured
Once these checks are complete, the project is ready for QRES analysis.
Processing time depends on the number of points, selected feature groups, study area size, internet connection, external service response times and computer performance. A progress bar in the plugin interface helps users monitor the calculation point by point.
For initial tests, users may wish to start with a smaller grid or fewer feature groups. Once the workflow has been checked, the analysis can be repeated with a larger dataset or a finer point resolution.
5. Running the analysis
Once the QGIS project, CRS and regular point grid have been prepared, users can run QRES from within QGIS.
5.1 Open QRES
- Open the prepared QGIS project.
- Make sure the regular point grid layer is loaded and visible.
- Launch QRES — Resilience Mapper from the QGIS plugin menu or toolbar icon.
- The QRES dialogue window will open.
5.2 Select the point layer to analyse
At the top of the QRES dialogue window, use Select the Point Layer to analyse to choose the prepared regular point grid.
This is the layer that QRES will use for the analysis. Each point in the selected grid will be processed as an individual location from which the plugin calculates accessibility to the selected urban resources.
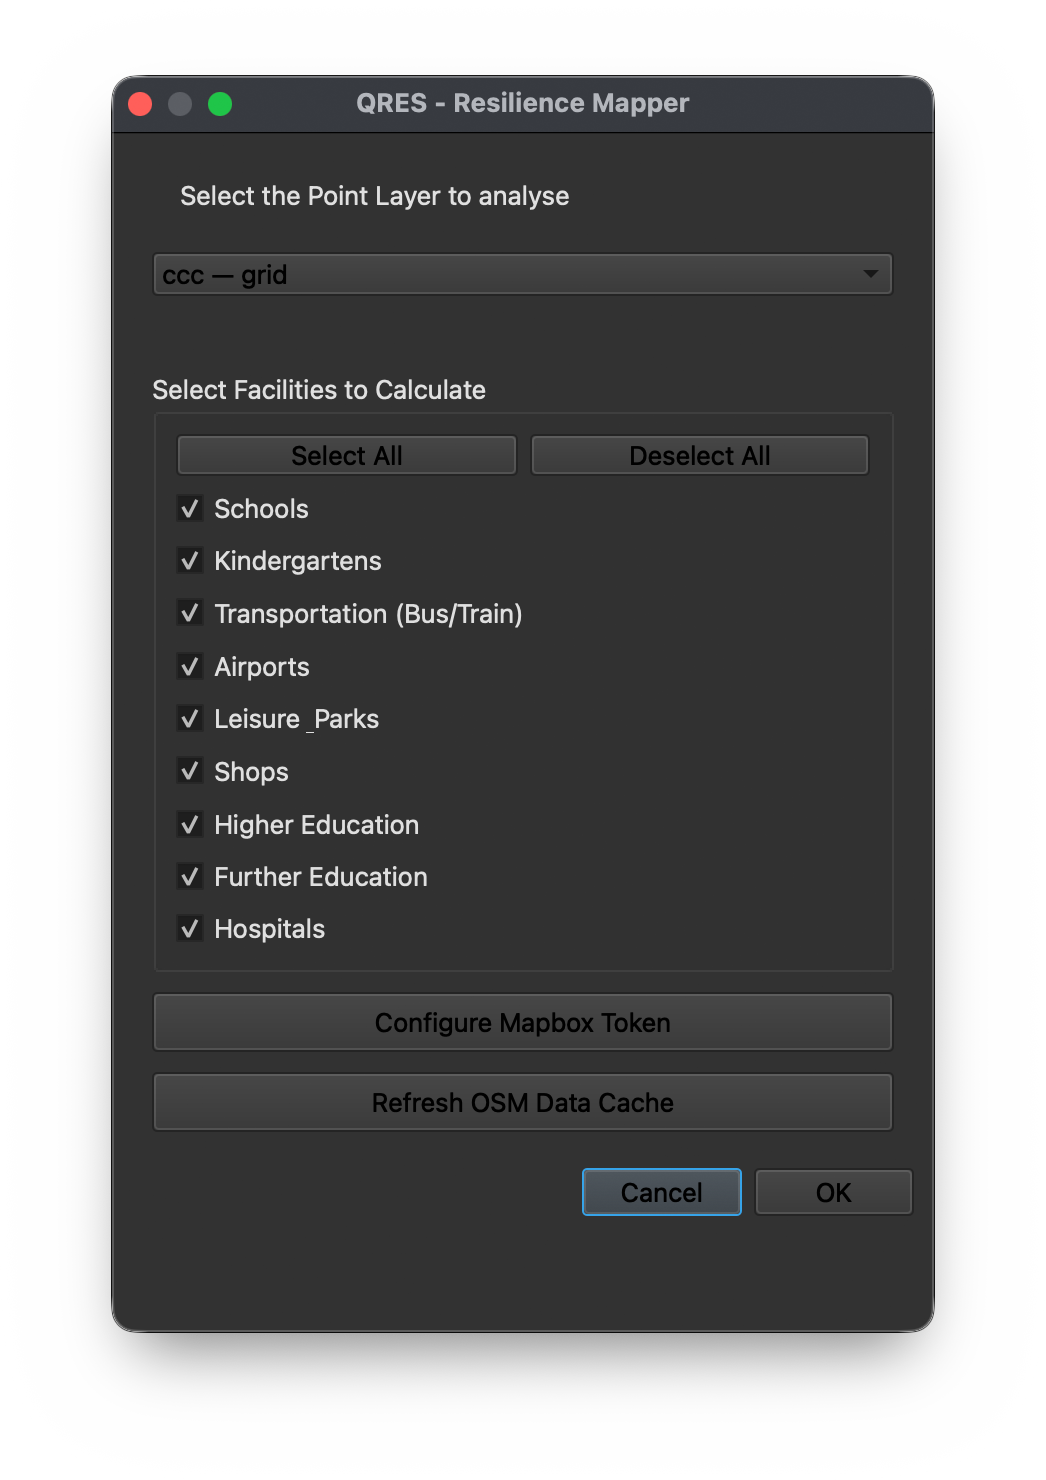
5.3 Select the Features to calculate
In the Select Features to Calculate section, choose the feature groups to include in the analysis. The current interface includes:
- Schools
- Kindergartens
- Transportation (Bus/Train)
- Airports
- Leisure_Parks
- Shops
- Higher Education
- Further Education
- Hospitals
Users can select individual feature groups, or use Select All and Deselect All to quickly manage the list. Selecting all features provides the most complete resilience assessment. Selecting fewer features can support a more focused analysis and may reduce processing time, especially when working with large study areas or dense point grids. The results will reflect only the features selected for that specific run.
5.4 Configure the MapBox token
A valid MapBox access token is required to run QRES.
The token is requested the first time the plugin is launched. If it needs to be added, corrected or replaced, click Configure MapBox Token in the QRES dialogue window and enter the updated token. Check that the token has been copied correctly, with no missing characters or additional spaces.
5.5 Refresh OSM data cache
The Refresh OSM Data Cache button updates the OpenStreetMap data used by the plugin. This operation is needed every time users analyse a new study area, so QRES can retrieve the relevant OSM data for that location.
It may also be useful when:
- repeating an analysis after OSM data may have changed
- correcting an analysis where expected facilities were missing
- ensuring that the plugin is not relying on previously cached data
Refreshing the OSM cache may increase preparation time, but it helps ensure that QRES is using up-to-date OSM information for the selected area.
5.6 Launch the analysis
After selecting the point layer, choosing the facilities and confirming the MapBox token, click OK to start the analysis. QRES will process the selected point grid and calculate resilience values based on the selected facility groups. Users should not close QGIS while the analysis is running.
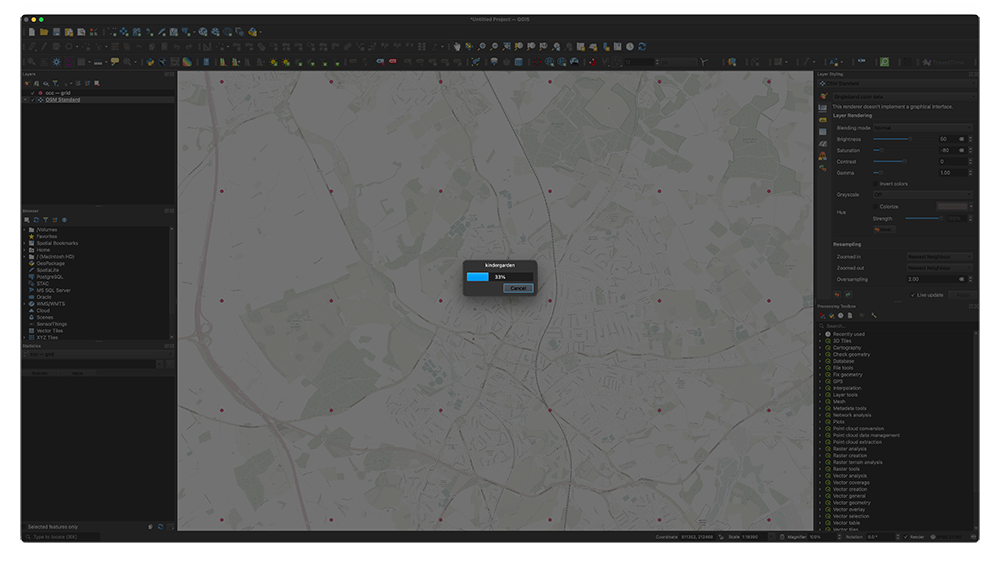
5.7 Monitor and complete the process
A progress bar shows the calculation progressing point by point. Processing time depends on the number of points, selected features, internet connection, MapBox response time, OSM data retrieval and computer performance. With QRES V2, users can normally continue using their computer for other tasks while the analysis is running.
When complete, QRES writes the output values into the attribute table of the original point layer. The table includes one value for each selected feature category, plus a total resilience value that combines all selected categories into a single overall score.
6. Understanding the outputs
When the analysis is complete, QRES updates the attribute table of the original point layer. Each point receives resilience values based on the selected feature categories.
6.1 Attribute table values
The output values are written directly into the point layer used for the analysis. The attribute table will include:
- a value for each selected facility category
- a total resilience value combining the selected categories
- the original attributes already present in the point layer, where applicable
For example, if users select Schools, Shops and Hospitals, the attribute table will include separate values for those categories, plus a total value calculated from the selected facilities.
6.2 Facility-specific values
Feature-specific values show how each point performs in relation to a particular group of urban resources. This helps users identify which areas are better or worse served by specific facilities. For example, a point may score highly for Shops but lower for Hospitals, revealing specific spatial strengths and weaknesses.
6.3 Total resilience value
The total resilience value combines the selected feature categories into one overall score for each point. It provides a synthetic indication of how well each point is served by the facilities included in that analysis. The total value depends on the categories selected before running QRES. An analysis based on fewer categories should not be compared directly with one based on all categories.
6.4 Interpreting higher and lower values
Higher values generally indicate better accessibility to the selected urban resources. Lower values indicate weaker accessibility. QRES values should be interpreted comparatively across the study area. They help identify relative spatial patterns, such as better-served areas, under-served areas, boundary conditions and differences between feature categories. The output should not be read as an absolute certification of resilience. It is an analytical measure based on selected urban resources, OSM data availability and MapBox travel-time calculations.
6.5 Exporting the results
Because results are stored in the point layer’s attribute table, they can be exported using standard QGIS tools. Users can export the updated layer or save the attribute table as a CSV file for further analysis, comparison, reporting or integration with other urban datasets.
7. Visualising the results
Once QRES has written the output values into the attribute table, users can visualise the results using standard QGIS styling tools.
7.1 Graduated point symbology
A simple option is to apply graduated symbology to the analysed point layer.
- Open Layer Properties.
- Go to Symbology.
- Select Graduated.
- Choose the total resilience value or a facility-specific field.
- Select a colour ramp.
- Classify the values and apply the style.
This method is useful for reading and comparing the values assigned to individual points.
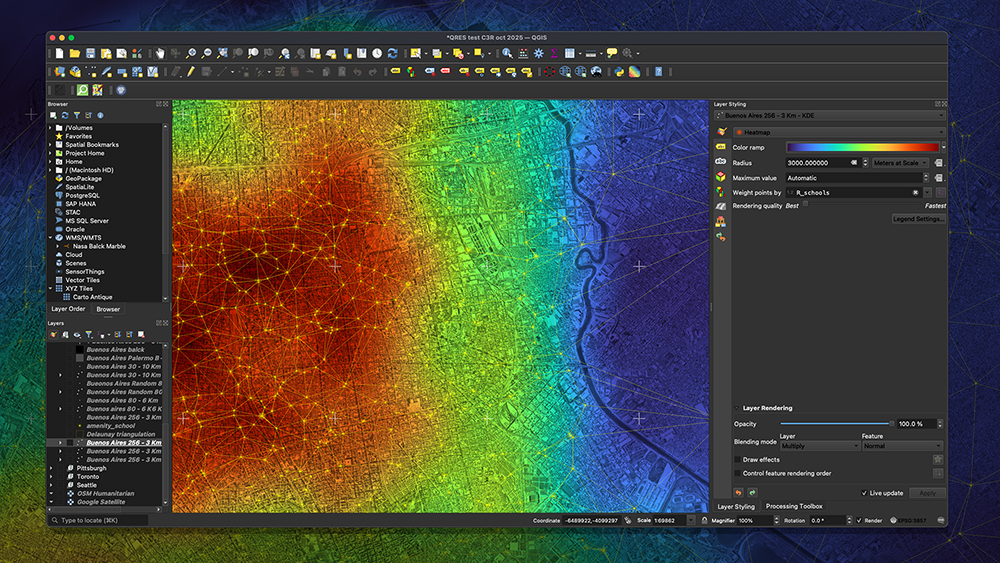
7.2 Heatmap / Kernel Density Estimation visualisation
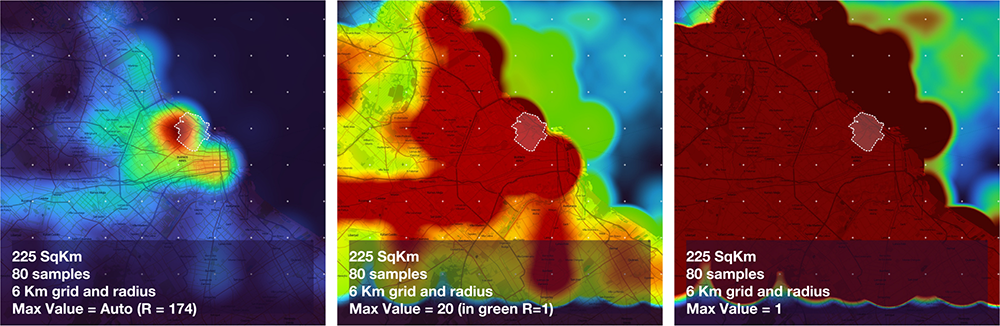
Users can also create a Kernel Density Estimation (KDE) heatmap to visualise broader spatial patterns of resilience. For best results, the heatmap radius should normally relate to the point grid spacing. A useful reference is the grid spacing multiplied by the square root of 2, which corresponds to the diagonal distance between neighbouring points in a square grid. For example, if the grid spacing is 1,000 metres, the diagonal distance is approximately 1,414 metres, so a radius around this value can provide a clear relationship between adjacent points. A much smaller radius may produce a fragmented map, while a much larger radius may over-smooth the results and reduce local detail.
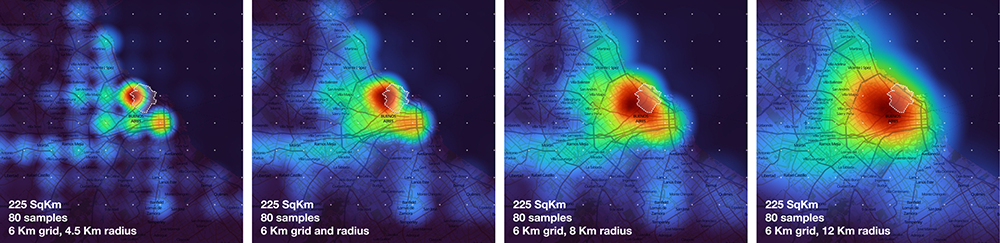
Users should also consider the maximum resilience value used for the heatmap. QRES values are relative to the specific calculation and are not linked to an external metric, so the maximum value can be adjusted according to the purpose of the map. Keeping the maximum value on Auto uses the highest R value within the current QGIS canvas extent and usually produces a clearer map of internal variation. A manual maximum value can be useful when applying a specific threshold or comparing different outputs. For example, setting the maximum to 20 means that areas with R values above 20 are shown at the top of the colour scale; setting it to 1 highlights all areas with R values above 1 as exceeding that threshold.
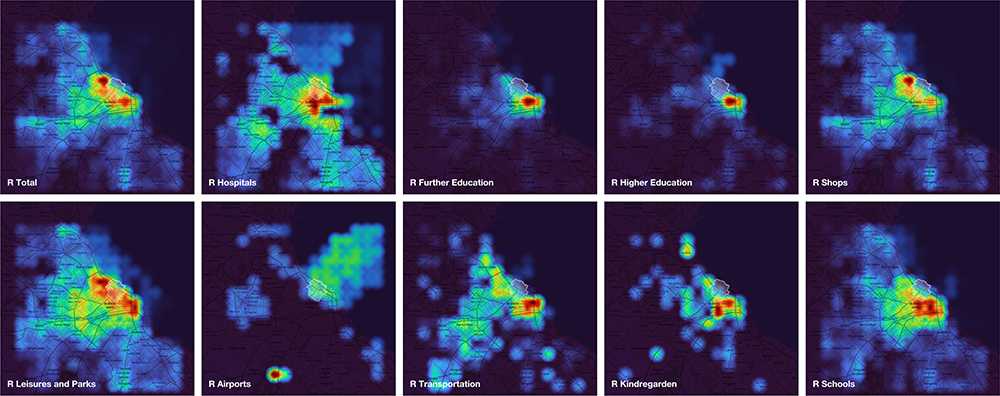
7.3 Total and category-specific maps
Users can visualise either the total resilience value or individual feature-category values by selecting the relevant field under “Weight points by” in the “Layer Styling” panel. The total value provides an overall picture of accessibility to all selected features. Category-specific maps help identify which resources are stronger or weaker in different parts of the study area.
7.4 Comparing outputs
QRES results can be used to compare neighbourhoods, districts, feature categories or different analysis runs. When comparing maps, users should keep the grid spacing, selected categories and visualisation settings. Using a fixed colour scale and maximum value can make comparisons clearer and more reliable.
8. Performance guidance
QRES V2 improves speed, reliability and stability compared with the original V1 prototype. In testing, it performed efficiently with large metropolitan datasets, and users can normally continue using their computer for other tasks while the analysis is running. Processing time is mainly affected by the number of grid points, selected feature categories, study area size, internet connection, MapBox response time and OSM data retrieval. For large or high-resolution analyses, users are encouraged to run a small test first. Check that the CRS, point grid, MapBox token and selected categories are correct before proceeding with the full analysis. Selecting fewer feature categories can reduce processing time, especially with dense point grids. The total resilience value will only include the categories selected for that specific run.
9. Limitations and interpretation
QRES is an analytical tool designed to support spatial assessment, comparison and decision-making. Its outputs should be read as part of a wider urban analysis process, not as an absolute or final measure of resilience.
9.1 OpenStreetMap data
QRES uses OpenStreetMap data to identify and locate urban resources. Results therefore depend on the quality, completeness and consistency of OSM data in the selected study area. In areas where OSM data is incomplete, outdated or unevenly mapped, the analysis may underrepresent some resources.
9.2 MapBox isochrones
QRES uses MapBox isochrones to calculate travel-time accessibility. This provides a more realistic measure than radial distance, but results still depend on the routing data and assumptions used by MapBox. Users should therefore interpret the outputs as accessibility-based estimates.
9.3 Point grid and study area
Reliable outputs depend on a well-prepared input grid. Users should use a regular point grid, an appropriate CRS in metres, suitable grid spacing and, where needed, a buffer around the study area. Irregular point distributions, unsuitable CRS settings or grids that are too coarse may reduce the quality of the analysis and visualisation.
9.4 Water bodies and non-urban areas
Points located over water, large parks, industrial voids or other non-urban areas may produce low or misleading values. Where these areas are not relevant to the study, users should consider removing them from the input grid before running the analysis.
9.5 Relative values
The QRES resilience value is relative to the specific calculation and to the facility categories selected by the user. It is not an established external metric or universal resilience index. For this reason, values should be compared within the same analysis, or between analyses that use consistent settings, rather than interpreted as absolute scores.
9.6 Professional judgement
QRES supports evidence-based urban analysis, but it does not replace local knowledge, site observation, stakeholder engagement or professional judgement. The outputs should be used alongside qualitative assessment, planning knowledge and other relevant urban datasets.
10. Troubleshooting
This section summarises common issues and possible solutions.
10.1 QRES does not appear in QGIS
- Check that QRES has been installed from Plugins > Manage and Install Plugins.
- Search for QRES in the installed plugins list.
- Make sure the plugin is enabled.
- Restart QGIS.
- Check that you are using a supported QGIS 3.x version.
The QGIS 4.x adaptation is currently in development.
10.2 The plugin does not run
- Check that the selected input layer is a point layer, saved and correctly loaded in QGIS.
- Check that the internet connection is active.
- Restart QGIS and try again.
10.3 MapBox token error
If QRES cannot generate isochrones:
- Open QRES.
- Click Configure Mapbox Token.
- Enter the token again.
- Check that there are no missing characters or extra spaces.
- Confirm that the MapBox account is active and that the request limit has not been reached.
10.4 Empty or unexpected results
- Check that the point grid covers the correct study area.
- Confirm that the selected facility categories are appropriate.
- Refresh the OSM data cache.
- Check whether the area is well mapped in OpenStreetMap.
- Check that the CRS is correct and set in metres.
10.5 Analysis is slow
Processing time depends on the number of points, selected facilities, study area size, internet connection and external service response times.
To improve performance:
- Run a smaller test first.
- Use a wider grid spacing.
- Select fewer facility categories.
- Remove unnecessary points outside the study area, over water, or in irrelevant non-urban areas.
10.6 Visual output looks unreliable
- Check that the input grid is regular.
- Avoid random or unevenly distributed points.
- Adjust the KDE heatmap radius in relation to the grid spacing.
- Use consistent colour scales when comparing different maps.
10.7 QGIS appears inactive
During larger analyses, QGIS may appear less responsive. Monitor the progress bar and allow the process to continue. Do not close QGIS while QRES is running.
11. Citation and credits
QRES should be cited together with the research publications that underpin its development. Users are encouraged to reference both the plugin and the related academic outputs when using QRES in research, reports, teaching, presentations or publications.
11.1 Suggested plugin citation
Pintacuda, L. and Sabiu, M. (2026) QRES — Resilience Mapper: A QGIS Plugin for Assessing Urban Resilience through Proximity-Based Analysis. Version 2. University of Hertfordshire and MKS D-Tech Ltd.
11.2 Research team
QRES is the result of a research trajectory developed by:
Dr Luigi Pintacuda, University of Hertfordshire
Mauro Sabiu, MKS D-Tech Ltd
Professor Silvio Carta, University of Greenwich
Dr Tommaso Turchi, University of Pisa
QRES V2, the first public release of the plugin (2026), was developed by
Dr Luigi Pintacuda, University of Hertfordshire
Mauro Sabiu, MKS D-Tech Ltd
11.3 Related publications
Pintacuda, L. and Carta, S. (2025) ‘Inferring Data through Mapping’, in Karunaratne, G. (ed.) Mapping, Narratives, Practices and Spatial Inquiry. Routledge. ISBN 9781032934204.
Pintacuda, L. and Carta, S. (2024) ‘Measuring Resilience: Leveraging Computational Methods and GIS Data for AI Decision-Making Tools’, in Karunaratne, G. (ed.) Resilient Urbanism. Routledge. ISBN 9781032748320.
Pintacuda, L., Carta, S., Turchi, T. and Sabiu, M. (2023) ‘QRES: A QGIS Plugin to Calculate Resilience Based on Proximity of Urban Resources’, Responsive Cities: Collective Intelligence Design, IAAC, Barcelona.
Carta, S., Turchi, T., Pintacuda, L. and Jankovic, L. (2023) ‘RECOMM. Measuring Resilient Communities: An Analytical and Predictive Tool’, International Journal of Architectural Computing.
Carta, S., Turchi, T. and Pintacuda, L. (2022) ‘Measuring Resilient Communities: An Analytical and Predictive Tool’, in CAADRIA 2022 Proceedings: 27th International Conference of the Association for Computer-Aided Architectural Design Research in Asia, Sydney, Australia, 9 April 2022.
Carta, S., Pintacuda, L., Owen, I. and Turchi, T. (2021) ‘Resilient Communities: A Novel Workflow’, Frontiers in Built Environment, 7. https://doi.org/10.3389/fbuil.2021.767779.