
Creating an event
Before you start
Events criteria
Please make sure your event is:
 a University event, we do not publicise events for 3rd parties.
- open to an external audience – it should be of interest and relevant to all who attend.
- written in a web friendly format according to the University's guidelines for written content.
What you need
To create an events page in Edit+, you will need the following information at hand:
- Image
- Events title
- Date, time and location details
- Contact name, email and telephone number
- Cost details (optional)
- Events summary - 1 or 2 sentences
- General information about the event – who is it for, why should they attend, what will they learn/experience?
- Booking url (optional)
- Supporting information links
It is best practice to publish an event only when all information can be provided. Avoid using 'To be confirmed' unless absolutely necessary.
What to do
Upload the image
 Size: 1440x500 (optionally 280x280 in addition)
Start by uploading your image.
- Open Edit+ by adding '/_edit' at the end of any url on the University's website.
- Click the 'New' button on the black strip at the top of the Edit+ screen. Select 'Files' and 'Image' from the window that appears.
- Browse to find the image file on your computer. The main banner on the page requires an image that is cropped to 1440x500 pixels (px).
- Optional: You may also want to upload a second image (the same photo but cropped to a different size) for the events pod, such as can be seen at the bottom of the homepage. These pods display images of 280x280px. If you do not want to upload this second image, your original photo will scale to the correct size, but you may want to do the crop yourself for more control over what is displayed.
- Enter a name, alt text and caption for the image - or both images. (The alt text should describe in a few words what you can see in the image. The caption is a slightly longer description. Both will help search engines and screen readers interpret the content of the image.)
- Set 'Decorative only' to no.
- Set 'Show in menu' to no.
- Choose 'Select new location' and use the asset finder to choose the folders 'Images > Events' before clicking the blue select button.
- Click the blue 'Create' button. (Note: Be careful not to click the close button that will appear in the same location in the next window.)
- Click the 'Edit' button that appears towards the top right-hand side of the screen – this takes you to the details screen of your image asset.
- Change the status of your image to 'Approve and make live' using the drop down menu.
- Click the green 'Save' button in the top right-hand corner of the screen.
Create the events page
 Next you will create the web page for your event.
- Click the 'New' button on the black strip at the top of the Edit+ screen.
- Select 'Single calendar event' from the pop up window.
- Enter the name, start/end date and times for your event.
- Set 'Show in menu' to no.
- Choose 'Select new location' and use the asset finder to choose 'About us > Events > Relevant year folder > Relevant month folder' before clicking the blue select button.
- Click the blue 'Create' button. (Note: be careful not to click the close button that will appear in the same location in the next window.)
- Click the 'Edit' button that appears towards the top right-hand side of the screen – this takes you to the details screen of your new events page.
Add events information
 Next, use the icons at the top of the page to add information on the details, contents and metadata screens.
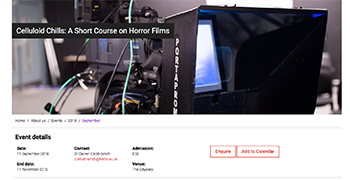
Details tab
- Add your thumbnail image to the events page by clicking the select button under Related Image.
- Use the asset finder to locate the image you uploaded under 'Images > Events > Year'.
- Click select to insert the image. Click the green 'Save' button to save the updated details page.
Note: If you decided to upload the second, smaller image, this is where it should be used.
Content tab
Write your content directly in Edit+ or copy your text from Word. Then click Save.
If you copy text from Word, 'hidden' HTML code may be copied across when you paste the text in to Edit+. To remove the hidden code, click 'Save' then highlight the text that you pasted in and click on the small brush icon on the toolbar above the text area. Click 'Save' again. You may not see any difference in the editing window but the code will be cleaned in the background.
Remember to style the text using the icons at the top.
Metadata
Scroll down the long metadata screen until you find the Events section. Untick the default option and add the following:
- Event.Summary – One or two sentences describing your event. The text will be visible together with the events title on the listing pages.
- Event.Venue.Name
- Event.Venue.Details – Add details of location, address and campus. Hyperlink link the campus name to the relevant page in 'About us > Where to find us' (using the small chain icon in the tool bar).
- Event.Contact.Name
- Event.Contact.Email
- Event.Contact.Phone
- Event.Admission – write 'FREE' if there is no charge to attend the event.
- Event.Booking.URL
- Event.Types
- News.Events.Options – Select the area/s relevant to your event. Your event will automatically feature in the University's main events listing in addition to the area/s you select.
Scroll to the bottom of the metadata page.
- Select the relevant Schools from the 'School News Events' section.
From the 'UoH Redesign Site Wide _ new' section you will need to apply the following settings:
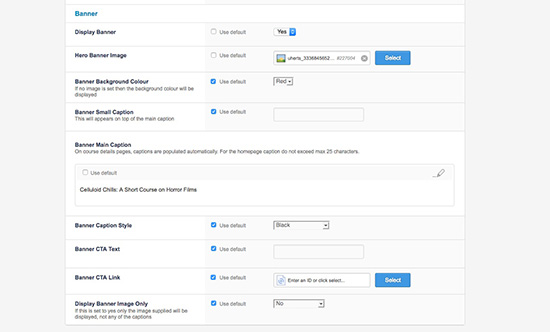
- Page settings - set the Page Layout dropdown option to 'Full width page'
- Display banner - set to yes.
- Hero banner image - this is where you insert the banner image you created earlier (sized 1440x500 px). Follow the steps as listed previously for inserting an image in the details tab remembering to select the larger image this time.
- Banner main caption - should be the same as your page name.
Click 'Save'.
Publish your event
 Before you publish the event, check that all the details are correct and that the links work as expected.
- Click the 'Preview' button to review the content.
- Click the 'Edit' button to return to the editing mode.
- When you are ready to publish the events page, change the status on the 'Details' screen from 'Under construction' to 'Apply for approval'.
- Click 'Save'.
Workflow
You event is now in workflow. The details will be reviewed by the central Events Team before they publish it out to the live website.
Sometimes you may be asked to make minor changes to the content before it is published. Comments and feedback from the central Team will be added to the workflow screen of your event.
Please contact the central Events Team if you have queries about arranging an event or need additional information on the workflow process.
Differences for microsites
For microsites that have not adopted the new design, (look substantially different to the main herts.ac.uk website), the only image size needed is 534x343 px. Follow all the same instructions but you can ignore the steps under the 'UoH Redesign Site Wide _ new' section. These options won't be visible to you.